KI Workaround installieren: Unterschied zwischen den Versionen
Aus exmediawiki
C.heck (Diskussion | Beiträge) |
C.heck (Diskussion | Beiträge) |
||
| Zeile 1: | Zeile 1: | ||
__TOC__ | __TOC__ | ||
| + | |||
| + | =Anaconda= | ||
| + | Anaconda ist eine Freemium-Open-Source-Distribution für die Programmiersprachen Python und R, die unter anderem die Entwicklungsumgebung Spyder, den Kommandozeileninterpreter IPython, und ein webbasiertes Frontend für Jupyter enthält. Der Fokus liegt vor allem auf der Verarbeitung von großen Datenmengen, Vorhersageanalyse und wissenschaftlichem Rechnen. Das Ziel der Distribution ist die Vereinfachung von Paketmanagement und Softwareverteilung. Paketversionen werden von der Paketverwaltung conda verwaltet. | ||
| + | ==Download & install latest Anaconda Version== | ||
| + | * go to page and find your version: https://www.anaconda.com/distribution/ | ||
| + | * or download directly: | ||
| + | ** for Mac: | ||
| + | *** https://repo.anaconda.com/archive/Anaconda3-2019.07-MacOSX-x86_64.pkg (650MB) | ||
| + | ** for Windows: | ||
| + | *** https://repo.anaconda.com/archive/Anaconda3-2019.07-Windows-x86_64.exe (486Mb) | ||
| + | ** for Linux: | ||
| + | *** https://repo.anaconda.com/archive/Anaconda3-2019.07-Linux-x86_64.sh (517Mb) | ||
| + | |||
| + | <u>'''Installationsanleitung'''</u> | ||
| + | * https://docs.anaconda.com/anaconda/install/ | ||
| + | ---- | ||
| + | on Ubuntu:<br> | ||
| + | after installing type: | ||
| + | source ~/.bashrc | ||
| + | that you can execute conda etc from out of terminal directly | ||
| + | ---- | ||
| + | |||
| + | ==Create Environement== | ||
| + | |||
| + | |||
| + | |||
| + | |||
| + | |||
| + | ==testing if it works== | ||
| + | in your environement (tf_gpu) open jupyter-notebook and run following python code: | ||
| + | from tensorflow.python.client import device_lib | ||
| + | |||
| + | print(device_lib.list_local_devices()) | ||
| + | |||
| + | see also: | ||
| + | * https://www.tensorflow.org/guide/using_gpu | ||
| + | |||
| + | |||
| + | |||
| + | |||
| + | |||
| + | |||
| + | |||
| + | |||
| + | =open jupyter notebook= | ||
| + | |||
| + | type Jupyter-button on your Desktop or | ||
| + | |||
| + | or type in Terminal: | ||
| + | jupyter-notebook | ||
| + | [[Datei:Content_jupyternotebook1.gif]] | ||
| + | ---- | ||
| + | '''how to use...?''' | ||
| + | |||
| + | [[Datei:Content_jupyternotebook3b.gif]] | ||
| + | ---- | ||
| + | [[Datei:Content_jupyternotebook7.gif]] | ||
| + | |||
| + | |||
=Install Jupyter & Tensorflow on Ubuntu= | =Install Jupyter & Tensorflow on Ubuntu= | ||
Version vom 7. Oktober 2019, 11:55 Uhr
Inhaltsverzeichnis
Anaconda
Anaconda ist eine Freemium-Open-Source-Distribution für die Programmiersprachen Python und R, die unter anderem die Entwicklungsumgebung Spyder, den Kommandozeileninterpreter IPython, und ein webbasiertes Frontend für Jupyter enthält. Der Fokus liegt vor allem auf der Verarbeitung von großen Datenmengen, Vorhersageanalyse und wissenschaftlichem Rechnen. Das Ziel der Distribution ist die Vereinfachung von Paketmanagement und Softwareverteilung. Paketversionen werden von der Paketverwaltung conda verwaltet.
Download & install latest Anaconda Version
- go to page and find your version: https://www.anaconda.com/distribution/
- or download directly:
- for Mac:
- for Windows:
- for Linux:
Installationsanleitung
on Ubuntu:
after installing type:
source ~/.bashrc
that you can execute conda etc from out of terminal directly
Create Environement
testing if it works
in your environement (tf_gpu) open jupyter-notebook and run following python code:
from tensorflow.python.client import device_lib
print(device_lib.list_local_devices())
see also:
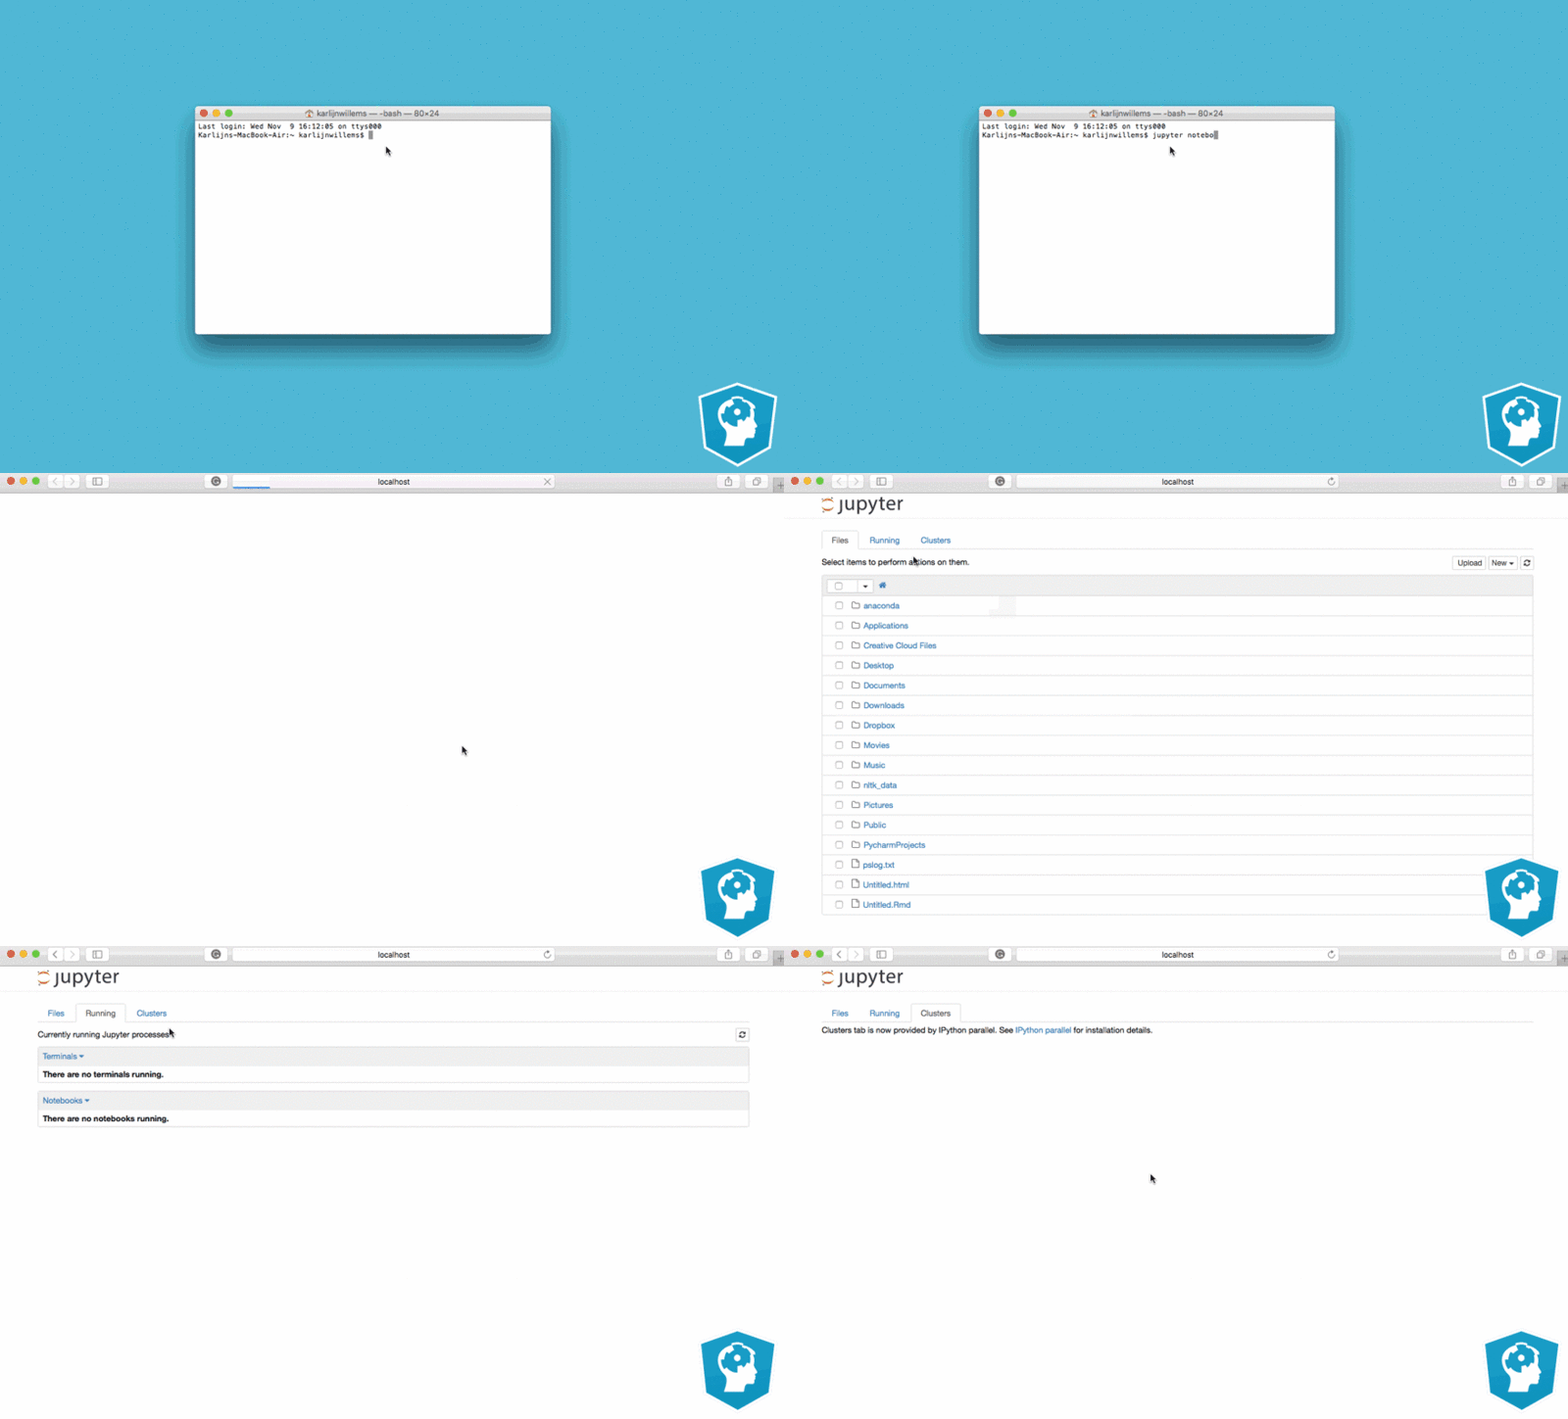
open jupyter notebook
type Jupyter-button on your Desktop or
or type in Terminal:
jupyter-notebook
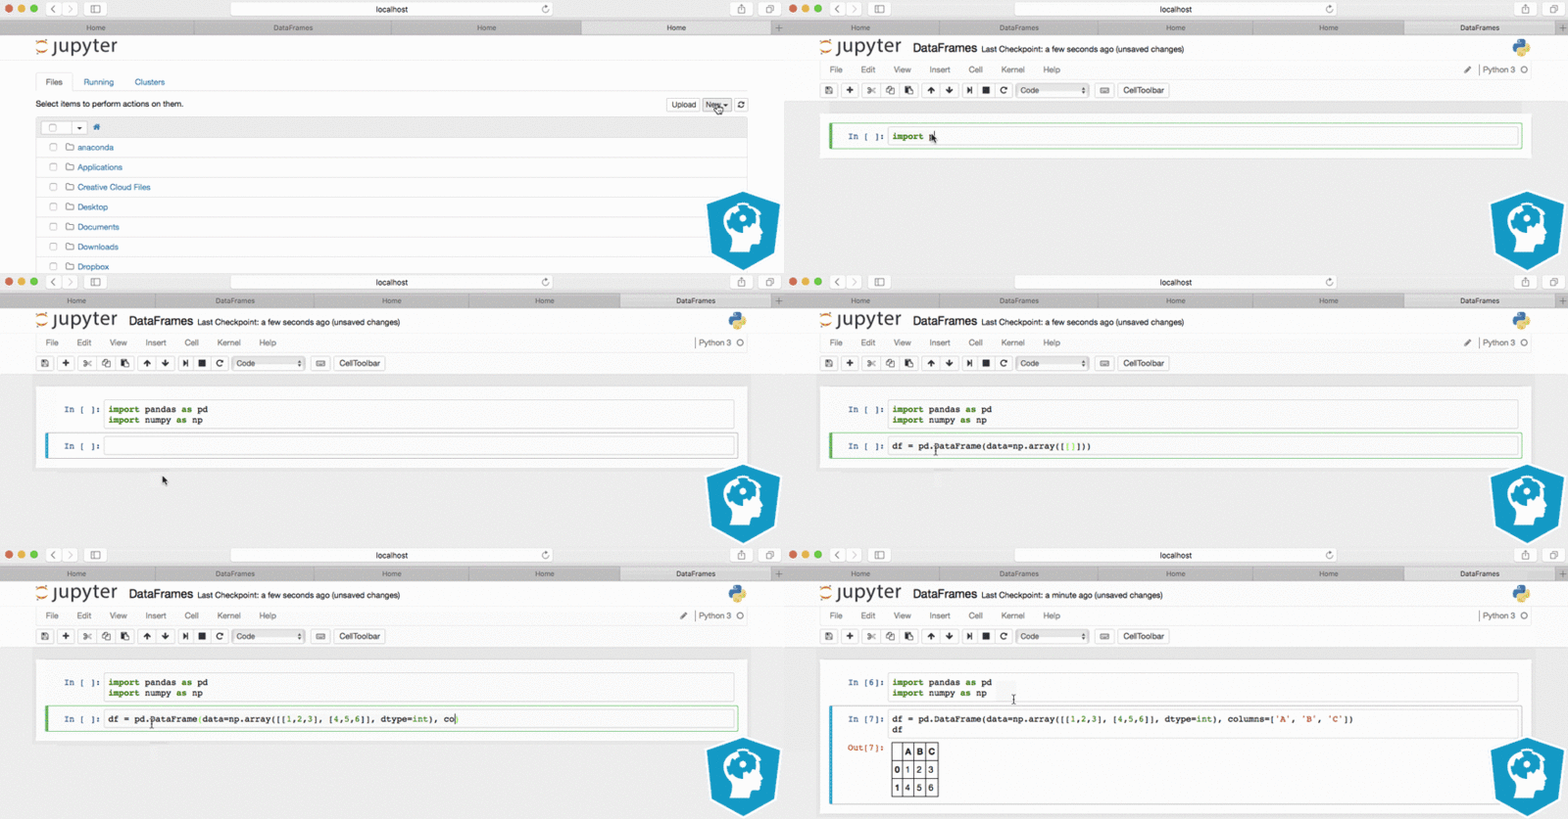
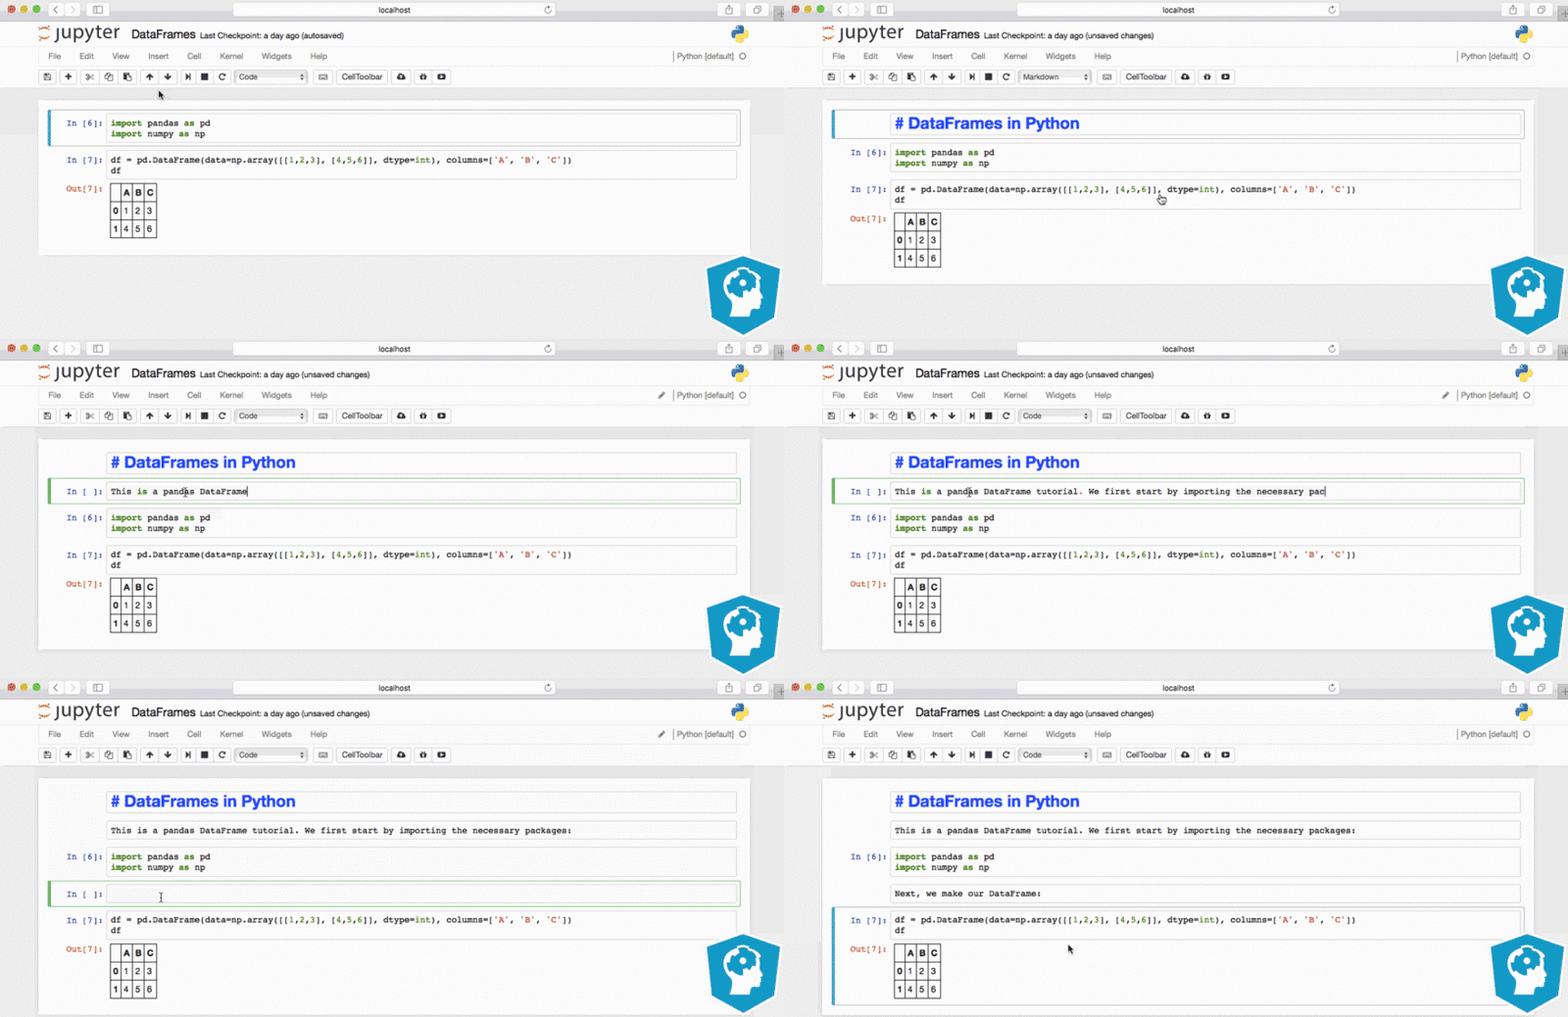
how to use...?
Install Jupyter & Tensorflow on Ubuntu
Python installieren:
sudo apt-get install python-pip python-dev
Wissenschaftliche Pakete installieren:
sudo apt-get install build-essential cmake git unzip pkg-config libopenblas-dev liblapack-dev
sudo apt-get install python-numpy python-scipy python-matplotlib
sudo apt-get install libhdf5-serial-dev python-h5py
sudo apt-get install graphviz
sudo apt-get install python-opencv
GPU-Unterstützung einrichten:
CUDA-Downloaden
wget https://developer.nvidia.com/compute/cuda/10.0/Prod/local_installers/cuda-repo-ubuntu1604-10-0-local-10.0.130-410.48_1.0-1_amd64
oder
wget https://developer.nvidia.com/compute/cuda/10.0/Prod/local_installers/cuda-repo-ubuntu1604-10-0-local-10.0.130-410.48_1.0-1_amd64.deb
Tensorflow installieren
ohne GPU
pip install tensorflow
mit GPU
pip install tensorflow-gpu
Keras installieren
pip install keras
alternativer keras install
git clone https://github.com/fchollet/keras
cd keras
sudo python setup.py install
Install Jupyter & Tensorflow on Windows
Download & Install anaconda
https://www.anaconda.com/download/#windows
Update Anaconda.
Open Anaconda Prompt and type
conda update conda
conda update --all
python environment, with python 3.5, named as "tensorflow"
conda create --name tensorflow python=3.5
environement aktivieren
activate tensorflow
Bibliotheken installieren:
conda install jupyter
conda install scipy
conda install pandas
conda install seaborn
conda install scikit-learn
conda install spyder
conda install matplotlib
evtl. PIP installieren
conda install pip
TensorFlow installieren
pip install tensorflow
Keras installieren
conda install -c conda-forge keras
danach type:
ipython
ipython prompt öffnet sich... > in diesem prompt type:
import tensorflow as tf
import keras
im anaconda prompt type um ein jupyter notebook zu starten in dem sich tensorflow code ausführen lässt:
activate tensorflow
jupyter notebook
Install Jupyter & Tensorflow on Mac
Download & Install anaconda
https://www.anaconda.com/download/
Update Anaconda.
Open Terminal and type
conda update conda
conda update --all
PIP installieren
conda install pip
PIP upgraden
pip install --upgrade pip
Tensorflow installieren
pip install --upgrade tensorflow # for python 2.7
pip install --upgrade tensorflow # for python 3.*
Keras installieren#
pip install Keras
im Terminal type, um ein jupyter notebook zu starten in dem sich tensorflow code ausführen lässt:
jupyter notebook


