3D printer@lab: Unterschied zwischen den Versionen
Aus exmediawiki
Karin (Diskussion | Beiträge) |
|||
| Zeile 198: | Zeile 198: | ||
Back to [[Main Page|Exmedia Wiki]] | Back to [[Main Page|Exmedia Wiki]] | ||
| + | |||
| + | [[Category:Machines]] | ||
| + | [[Category:Material]] | ||
Version vom 26. April 2021, 18:24 Uhr
Inhaltsverzeichnis
3D Printer @ Lab
3D Printing is a Technology which makes it possible to reproduce digital objects in physical space.
The 3D Printer in the Lab is a Ultimaker 3. It utilizes so called FDM Technology to produce three dimensional objects.
It is operated with the Cura Slicing #Software
Safety
Please read this when you never used a 3D Printer:
The Nozzle and Parts inside the Printhead get Hot (200 degrees Celsius or more),
so make sure not to touch anything with your hand when the printer is heated up.
Also dont put your hand insinde the printer while its printing, the printhead moves around quickly and can squeeze your fingers badly.
Don´t leave the machine working unsupervised, unless you´re certain what you´re doing and super experienced with 3D Printing.
Hint: Printed parts can get loose during the printing process and then mess up and damage the printer.
Make sure to respray the build plate after serveral prints and especially when you do a large and long running print.
Alway check the preview in your slicing software before printing to recognize errors even before printing.
Do not use unapropiate tools when you have a problem with the printhead.
If you encounter problems, please ask somebody who knows how to help it.
And last but not least: 3D Printing is slow, so you have be patient ;-)
CNC Machine @ Lab
Getting started
Here you´ll find information aimed at getting started with 3D Printing. To sum it up shortly:
- Before you start, read about the #Safety
- Install Cura
- Make Sure that the correct filament is inserted and that enough material is left on the spool.
- Apply a little spray of "3D Lac" to the glassplate on the printing bed.
- Open Cura and import your 3d model.
- If necessary correct your model orientation, adjust slicing parameters and finally hit the "slice" button.
- Go to the preview windows and observate how your model will be printed. It´s a good idea to slide through all layers to inspect them once.
- Hit the print button and watch the printer taking action.
- If everything looks right, wait until your print is finished. If something weird happens cancel the print with the menu interface on the printer.
- When the print is finished, carefully use a spatula to lift your part up from the glass buildplate.
- With bigger parts or if you sprayed much, it could be necessary to take out the glass surface to be able to apply more force
- If necesary clean the glass plate in water from time to time.
Technology
There exist in general different technical approaches to 3D Printing which utilize different processes and materials. The most popular one at the moment it called FDM which is a abbreviation for fused deposit modelling. It works by having a Roll of thin Plastic Filament which is melted by heat inside the print head. The head moves around a motion path while extruding the plastic through a thin nozzle to the final shape of the Object. Typicaly this happens layer by layer, in single vertical slices. So you could argue that this is not fully 3D but more a 2.5D printing because the head just moves in 2 dimensions simultaneously while printing. The color of the printed object is the same as the material you feed the printer with. But FDM Printers work with different types of materials or filaments as you would call it and they are available in a variety of colors and propertys. The Ultimaker printer in the lab has a printhead with is capable of using two filaments at once. Therefore combinations of different types of plastics with different properties are possible. During the printing the filament is extruded through a nozzle which typically has a size of 0.4mm. This determine that the finest line or detail, which could be drawn by the printer in x/y direction is in the same range. The resolution in the Z axis is determined by the layer height of the slices. The smaller they are, the finer will the detail of the printed object be, but it will take way more time. Typical layer heights reach from 0.05mm to 0.3mm.
Materials
There exists a wide variety of filaments, which all come with different properties, but the most important one is the diameter. So if you want to buy some printing material its important so look out for the right size. The Ultimaker 3 printer in the LAB uses 2.75mm Filament diameter. Warning from personal experience: Don´t buy filament sold as 3 mm because that will be too thick for the Ultimaker and will get stuck. Also sometimes the tolerances on the diameter is not so tight when buying cheap filament, this will lead to lower quality prints. That is because the amount of material that the printer will extrude will relate to the diameter of the filament and if that changes every few meters the structure in your print will also be not uniform.
- PLA
This can be considered as kind of standard 3d printing material. It is a plastic with a organic source which is easy to print.
- PETG
- ABS
Software
For 3D Printing apart from software for creating, manipulating and repairing 3D Files themselfes you will need a so called "Slicer".
It takes your 3D Model and slices it into single layers and then calculates the machine code to print out the object layers by layer on the printer.
The finished machine code (GCODE) is then transferred to the printer to print it out.
This could be done via an SD Card, USB Cable or Network.
Cura is a or slicing software or "Slicer" as you would call it.
That means, basically what it does is it takes a File containing your 3D Geometry and converts it into Gcode file, which the printer can read and print out.
The transfer to the printer could happen via SD Card, Memory Stick or over wired or wireless Network.
Installing and getting started
After downloading just execute the file and proceed trough the setup procedure.
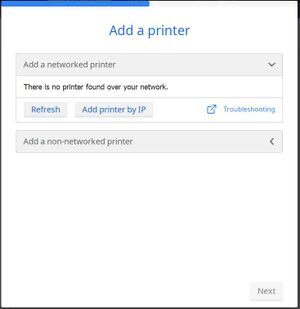
When finished and starting Cura for the first time, you will be prompted to add a printer.
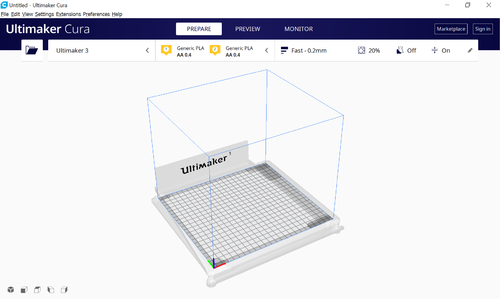
If you don´t want to configure your printer right now then just choose generic FFF printer from "non networked printers" and hit "continue" twice to add it without further configuration. When you want to use the printer in the LAB choose Ultimaker 3 from the dropdown menu under networked printers. After clicking "next" you have to enter the IP Address of the Printer. It should be "172.18.x.x", but just in case you have connection Problems with that you can look the address up via the physical display on the printer. After doing so Cura should look something like this:
In the top row you find "Prepare | Preview | Monitor". Those correspond to three different views in Cura.
- Prepare covers loading your 3D Model, moving and resizing it on the build plate and setting the slicing paramenters
- Preview gives you a preview over the layers and additional structure (i.e. support) that will be printed.
- Monitor shows information about the connected printer and eventually running printing processes.
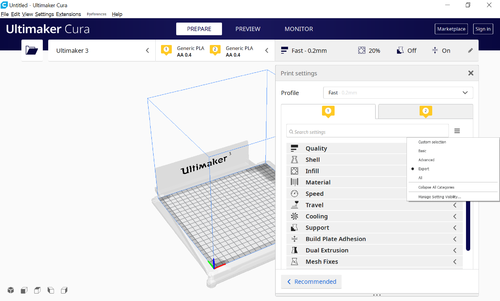
In the colum below the selected printer is shown (Cura can handle multiple printers), the material that cura thinks is inserted into the printheads (Ultimaker has 2 Printheads), and the name of the selected slicing profile. If you click on the right section with the profile name you will be presented with a variety with slicing settings. Some settings are more and other are less important so there exist different levels of visibilitys. You can toggle them by clicking the three little stripes aka burger menu.
The Settings are Grouped into different areas (Quality, Shell, Infill etc..) and Cura organizes the status of them them in so called "Profiles".
If you tweaked a dozens of settings to your liking it might be a good idea to save them as a seperate profile which you can then revert to in the future.
This makes especially sense because it might be the case that you need several type of settings for one kind of object that you want to print and totally different settings for other objects.
Slicing Parameters and Settings
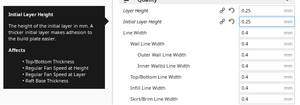
There are way to many parameters to describe them all here. But Cura is nice enough to give you a hint when you hover over a settings field for some seconds. So following here i will just describe some important settings.
- Quality:
The most important Setting here is the Layer Height. Typical Values range from 0.25 or 0.3 max to min 0.05. The smaller you go the finer detail you´ll get on the vertical or Z axis in your print but also the more time it will take. Cura allows different settings for the first layer, this could improve bed adhesion.
- Shell
"Wall thickness" and "Wall line count" will determine how thick the outer wall of your model will be. If you need very stable or wterproof parts you can add more walls here. "Z Seam Alignment" is important, because it decides if the printer starts every layer in the same or in a randowm spot. Starting in the same spot can lead to a visible seam wich is sometimes anoying. "Print thin walls" could be interesting if you have a model with super thin parts which are filtered out when this setting is active. "Optimize Wall Printing Order" can save printing time on long prints, so it´s worth comparing the precalculated time checked and unchecked.
- Infill
"Infill Density" sets the amount of infill in percent. If you set it to 0 your print will be hollow, if you set it to 100 you print will be massive and most likely take forever (seriously: rare cases when you need to do this). Normally set it to something between 5 and 25%. You can also set all kinds of fancy infill parameters, but the percentage is the only value that needs to be tweaked often.
- Material
Here you set the temperatures and flow rates. There are two temperatures to be set: "Printing Temperature" and "Build Plate Temperature". For Pla the printing temperature ist usually around 200°Celsius and the Build Plate temperature can be set to 0° With PlA it´s not necesary to heat the bed, instead apply a little spray of 3DLac before you start the print. The Flow is used to correct for differences in the Filament diameter. So if you bought some cheap filament and find that the diameter is not quite right you can try to correct for that with this setting.
- Speed
Here you can tune the speed at which the printer is operating. It´s not recommended to raise it, as it´s set quite high in the preset. You can lower it, if you find some annoying artefacts in your print. Generally: The faster you print the lower the quality of the print will be.
- Travel
"Retraction": most important Setting here. For almost all prints make sure it´s checked. it prevents oozing plastic from the nozzle when the printheads moves without extruding by pulling it back. It could be necessary to turn off with some kind of filaments.
- Cooling
Sets some Options on how to cool the printed parts. The Printhead has a fan which is used to cool the extruded plastic as soon as it´s extruded. This makes little overhangs better printable. Normally i would recommend leaving all parameters here as they are.
- Support
"Generate Support" this decides if Cura should generate a holding structure for parts that are in mid air. If you check this you will be presented with many settings controling how the support should look like. "Support Placement" is an important setting, it decides if support is placed in the model itself or just from the buildplate upwards. The Support has to be manually removed after printing, so if you have trouble removing it you should take a look at the "Support X/Y" and "Support Z" Distance Settings. Also the Support Density controls how thick the Support is printed. If you want to save some time in your print you can lower it a bit.
- Build Plate Adhesion
Here basically you have 4 Options: Brim, Skirt, Raft or none. In 3D printing you´ll often encounter Problems with the printed object getting loose from the printbed thus disrupting the print. One strategy to take care against that is a Raft and a Brim. A Brim simply extends the first layer in the X and Y direction so that your object has a bigger adhesion surface to the bed. The Raft does the same but also moves the object a little bit up and places support under it, so that it sits completely on an printed island. For both options you need to remove the material after printing. I would recommend setting this to Skirt, wich draws some lines around your object before starting the print, just to get the extrusion started.
- Dual Extrusion
Here you can set the behaviour for dual extrusion prints
- Mesh Fixes
If you see unwanted infill in some parts in the preview or weird behavior then chances are that there is something wrong with your mesh data. In that Case you can try some of these options, otherwise you would have to try to fix it in Meshmixer or Blender.
- Special Modes
Contains some gimmicks, for example the automatic generation of a mold from the object. Here under "Spiralized Contour" you can acticate the so called Vase mode. In this mode the Slicer will take the outer contour of your object and follow it in a single path spiral. This just works for single branched object, that will in the end most likely look like some kind of vase :-))
- Experimental
"Tree Support" is a relativeley new option for much more efficient support and definitely worth checking out in some situations.
Also "Adaptive Layer Height" could save you some printing time while maintaining your models finer details.
Starting and monitoring a print
After importding a 3d model (click the open folder icon, or drag´n drop it to Cura) and tweaking all parameters to your liking
you need to hit the blue "Slice" button and cura starts to convert your model into gcode.
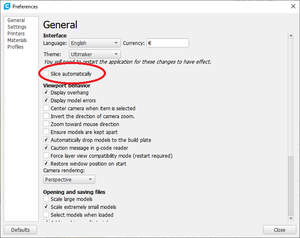
There is a option, which does that automatically when you change something in the slicing paramers.
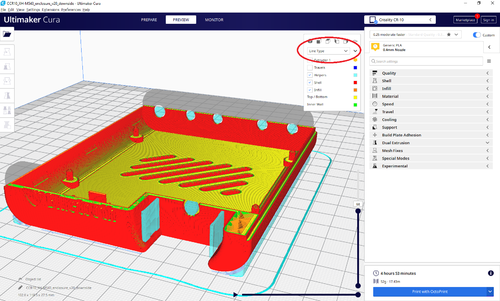
After that you will be presented with a ruff time estimation for the print and also a material calculation in meters and grams. Instead of clicking the "Print" button it is strongly recommended to click on "Preview" to get an idea what the print will look like. It will become even more clear, when you change the display to "Line Type". Then it´s easy to see how the support will look like and where it will be placed. On the right side you´ll find a slider which lets you slide through all of the layers in the print. Give special attention to the first layer and check to see if it look reasonable.
Then you can hit the print button and go to the printer. Apply a little spray of 3DLac to the printbed while the printer heats up and watch how it drops the first layer of your print. Check the printer frequently to make sure everything goes well with your print. When the print is finished you can take a spatula and remove your print from the glass plate. Especially with larger prints they could stick so much to the bed that it is necessary to take out the glass, so that you can apply more force to the plate. This is important, bacause the printer could get damaged if you apply too much force on its bed.
Back to Exmedia Wiki
