Über SSH auf AI-Lab-Rechner zugreifen: Unterschied zwischen den Versionen
Aus exmediawiki
C.heck (Diskussion | Beiträge) |
C.heck (Diskussion | Beiträge) |
||
| Zeile 92: | Zeile 92: | ||
$ scp -r ~/Ordnername exmedialab-team@194.95.162.14:/home/exmedialab-team | $ scp -r ~/Ordnername exmedialab-team@194.95.162.14:/home/exmedialab-team | ||
$ scp -r exmedialab-team@194.95.162.14:/home/exmedialab-team/Ordnername ~/ | $ scp -r exmedialab-team@194.95.162.14:/home/exmedialab-team/Ordnername ~/ | ||
| − | |||
| − | |||
| − | |||
| − | |||
| − | |||
| − | |||
| − | |||
| − | |||
| − | |||
| − | |||
| − | |||
| − | |||
| − | |||
| − | |||
| − | |||
| − | |||
| − | |||
| − | |||
| − | |||
| − | |||
| − | |||
| − | |||
| − | |||
| − | |||
| − | |||
| − | |||
| − | |||
| − | |||
| − | |||
| − | |||
| − | |||
| − | |||
| − | |||
| − | |||
| − | |||
| − | |||
Version vom 31. März 2019, 03:53 Uhr
Inhaltsverzeichnis
hilfreiche Kommandos
$ ssh username@IP-adress # Login Lab-Rechner
$ ssh -X username@IP-adress # graphical Login (X Forwarding)
$ cd  # (Change Direction) sich durch den Rechner navigieren
$ ls # (list) aktuellen Verzeichnisinhalt anzeigen
$ mkdir foldername # Ordner anlegen
$ scp ~/Bsp.jpg username@IP-adress:/home/username # Dateien zwischen eigenem und Lab-Rechner kopieren
$ vim # Bildschirmorientierter Editor
$ exit # Logout aus Lab-Rechner
Workflows
In AI-Lab-Rechner über SSH tunneln
detailllierte Info zu SSH: https://wiki.ubuntuusers.de/SSH/
Von Linux zu Linux
1. eigene ssh Konfigurationsdatei öffnen & editieren
$ sudo vim /etc/ssh/ssh_config
die zwei zeilen in der Konfigurationsdatei:
  # ForwardX11 no
  # ForwardX11Trusted no
wie folgt umändern:
  ForwardX11 yes
  ForwardX11Trusted yes
2. sich über SSH auf Lab-Rechner einwählen (X-Forwarding)
$ ssh -X exmedialab-team@194.95.162.14
Output mit yes bestätigen
The authenticity of host '194.95.162.14 (194.95.162.14)' can't be established.
ECDSA key fingerprint is SHA256:KwHC3VDTosZC1utqoAm6o7H32HLxd7O2kIylld3PFLY.
Are you sure you want to continue connecting (yes/no)?
Please type 'yes' or 'no': yes
Passwort eintippen (der Cursor bleibt beim Tippen des Passworts still)
Warning: Permanently added '194.95.162.14' (ECDSA) to the list of known hosts.
exmedialab-team@194.95.162.14's password:
Willkommensnachricht (Bsp):
Welcome to Ubuntu 16.04.6 LTS (GNU/Linux 4.4.0-142-generic x86_64)

* Documentation:  https://help.ubuntu.com
* Management:     https://landscape.canonical.com
* Support:        https://ubuntu.com/advantage

Last login: Fri Mar 29 12:38:20 2019 from 162.13.2.1
Von Mac zu Linux
1. xquartz downloaden und installieren
Download-URL: https://www.xquartz.org/
2. xquatz starten (Finder > Programme > Dienstprogramme > XQuartz)
ein kleines xterm fenster öffnet sich
3. sich über SSH auf Lab-Rechner einwählen (X-Forwarding)
type in X-Term Fenster:
$ ssh -X exmedialab-team@194.95.162.14
Output mit yes bestätigen
The authenticity of host '194.95.162.14 (194.95.162.14)' can't be established.
ECDSA key fingerprint is SHA256:KwHC3VDTosZC1utqoAm6o7H32HLxd7O2kIylld3PFLY.
Are you sure you want to continue connecting (yes/no)?
Please type 'yes' or 'no': yes
Passwort eintippen (der Cursor bleibt beim Tippen des Passworts still)
Warning: Permanently added '194.95.162.14' (ECDSA) to the list of known hosts.
exmedialab-team@194.95.162.14's password:
Willkommensnachricht (Bsp):
Welcome to Ubuntu 16.04.6 LTS (GNU/Linux 4.4.0-142-generic x86_64)

* Documentation:  https://help.ubuntu.com
* Management:     https://landscape.canonical.com
* Support:        https://ubuntu.com/advantage

Last login: Fri Mar 29 12:38:20 2019 from 162.13.2.1
Von Windows zu Linux
1. Putty downloaden und installieren
Download URL: https://www.chiark.greenend.org.uk/~sgtatham/putty/latest.html
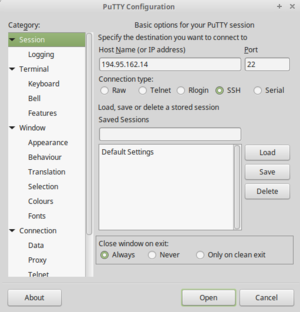
2. Putty starten
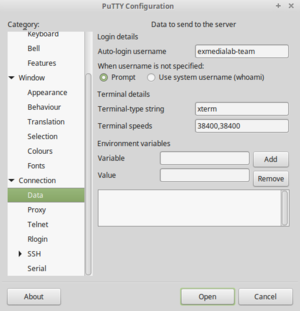
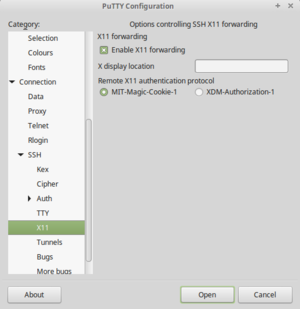
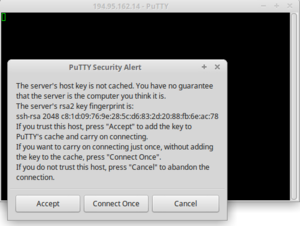
3. Verbindung erstellen (Verbindungsdaten eintragen)
 |

|
 |

|
4. mit "Connect Once" einloggen und Passwort eintippen
Willkommensnachricht (Bsp):
Welcome to Ubuntu 16.04.6 LTS (GNU/Linux 4.4.0-142-generic x86_64)

* Documentation:  https://help.ubuntu.com
* Management:     https://landscape.canonical.com
* Support:        https://ubuntu.com/advantage

Last login: Fri Mar 29 12:38:20 2019 from 162.13.2.1
Dateien kopieren zwischen Home-Rechner und Lab-Rechner
einfaches Kopieren
$ scp ~/Bsp.jpg exmedialab-team@194.95.162.14:/home/exmedialab-team
$ scp exmedialab-team@194.95.162.14:/home/exmedialab-team/Bsp.jpg ~/
Rekursives Kopieren (Ordner+Inhalt)
$ scp -r ~/Ordnername exmedialab-team@194.95.162.14:/home/exmedialab-team
$ scp -r exmedialab-team@194.95.162.14:/home/exmedialab-team/Ordnername ~/