Risograph@lab
Aus exmediawiki
overview page machines and technologies@our labs
Risograph @ Lab
Risograph is a brand of digital duplicators manufactured by the Riso Kagaku Corporation, that are designed mainly for high-volume photocopying and printing. It was released in Japan in 1980. The RISOGRAPH is a stencil printing style digital duplicator. It uses a printing technique that makes an original master by making microscopic holes in the master with thermal heads and passing ink through them to transfer an image onto paper. Due to working with vegetable based ink (soy) and organic based master, large-volume printing with less power consumption than e.g. offset, printing with the risograph is environmentally considerate.
Materials and ink
- paper: from 60 gr. to max. 300 gr. The paper should be uncoated, eg Munken Print. (We have paper available for first testing.)
- ink: vegetable based mark (rice bran oil ink for black, vegetable oil ink for colours)
- master: rice waste based paper
- available colours at our lab: two shades of blue, yellow, dark green, fluorescent/ neon pink, black, (unfortunately no more gold):
Getting started
The following is to explain the general riso printing process and to jog your memory.
Before you print on your own: There will be an introduction by me (Karin) and discussion of your project in advance to clear up questions, what preparations are necessary and what kind of riso prints would be the most suitable for your idea.
Preparing images
some basics (explained by risotto studio):
basic print setup
file preparation:
- The Risograph prints one color at time. Therefore, your final print files should be separated into individual grayscale images for each color that is to be printed. This is similar to preparing files for screen printing.
- 100% black in each color layer, will print out as 100% of whichever color you are printing. 90% black will print as 90% and so on.
- For images prepared in Photoshop, separate out each color layer or channel into individual gray- scale files.
- For images prepared in Illustrator/InDesign, separate out each color layer into individual grayscale PDFs that can be printed from Acrobat.
- Your final file should be A3 in portrait orientation. The top of your file is the lead edge of the paper when loaded into the printer.
- Working with a CMYK file in Photoshop, when your file is ready to print, open the Channels Menu and select Split Channels. This will create new grayscale files, one for each color channel from your template.
- Alternatively, if you have prepared your color separations in layers instead of channels, you can use the File > Export > Layers to Files function to split them into individual files. Then open each file, convert it to grayscale, and print it.
- When sending your print from the pc, you have several “Screening” options in the Image tab. This will control how the Risograph half-tones your image to convert it from a digital file to a physical stencil.
- Grain-touch is a randomized diffusion dither pattern.
- Screen-Covered creates classic halftone patterns. Screen Frequency will control the size of the dots produced (higher numbers = smaller dots).
- Screen Angle will control the angle that the pattern is set to.
- If you want to avoid a moire-pattern when printing CMYK you can set the angles in different variations. Eg (Yellow: 0%) - (Pink: 75%) - (Blue: 15%) (Black: 45%)
Printing
- switch the printer on
- open the tray and the feeder
- type passcode: 1914
- start with "MasterMake"
- feed paper: it's always better to set an excess amount of paper - if there is only a few sheets remaining, often paper jam happens
- set ink cartridge (there are pink, blue, medium blue, green, yellow, gold and black)
- turn on the PC
- transfer data using Wolke (private window recommended) or USB stick
- lazy way
- print from the browser
- set to no frame, and adjust the magnification to fit the paper
- proper way
- open the paper in acrobat etc
- press print settings (Einstellungen)
- ...
- on the printer, press Pause
- press Output. It will start making a "master", and print 2 sheets
- use the keypad to set the quantity and print
Cleaning
...
generally after your printing process: with a soft tissue/ cloth and some water, clean residue at the machine
during the process: if necessary, the roll at the paper feeder must be cleaned carefully with a damp cloth to avoid ink abrasion on subsequent paper
Tips and Sources
before following any tutorial in preparing your files, please talk to me what is best for your project and idea.
to take a look at some risoprinting studios and their approach:
- one example of a how-to-guide
- generally a good source: Studio Risotto
- very detailed informations can be found at exploriso
- something else: https://antiboredom.github.io/p5.riso/
- an interesting alternative to work with separations of the colour levels, try out
spectrolite, a desktop app for mac, to eg riso-ify your coloured images. and in general the site is giving a good overview also about best practices and other sources.
to be continued
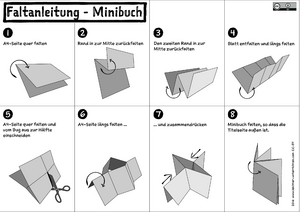
a simple instruction for a quick zine
see also tips and tools for zines: here

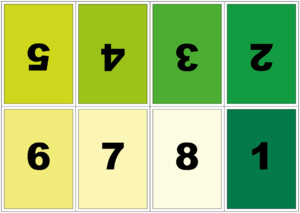
zinefold: example for the 8pages-fold eg for A3
Working with Processing
see some links on the page of our grundlagenseminar: material & process
to be continued....
Contact
in case of questions/ if you would like to discuss a project/ get an introduction to the risograph, write to Karin:
Back to main page exmedia wiki
Back to machines and technologies@our labs

